
Showing posts with label dilema. Show all posts

5.6.15

detailing: laundry / kitchenette


 I haven't done a house building, detail post for a long time. I've found these posts helpful to keep track of our decisions and ongoing direction. The middle level of our house, where we are living, is completed from a structural view but not finished in terms of flooring, joinery or styling. We're sort of 'glamping' till we move upstairs and then, the vacated areas can be completed.
I'm currently seeking quotations for the laundry / kitchenette so I thought a post on this multi-task space would be pertinent. Below are our plans for this space:
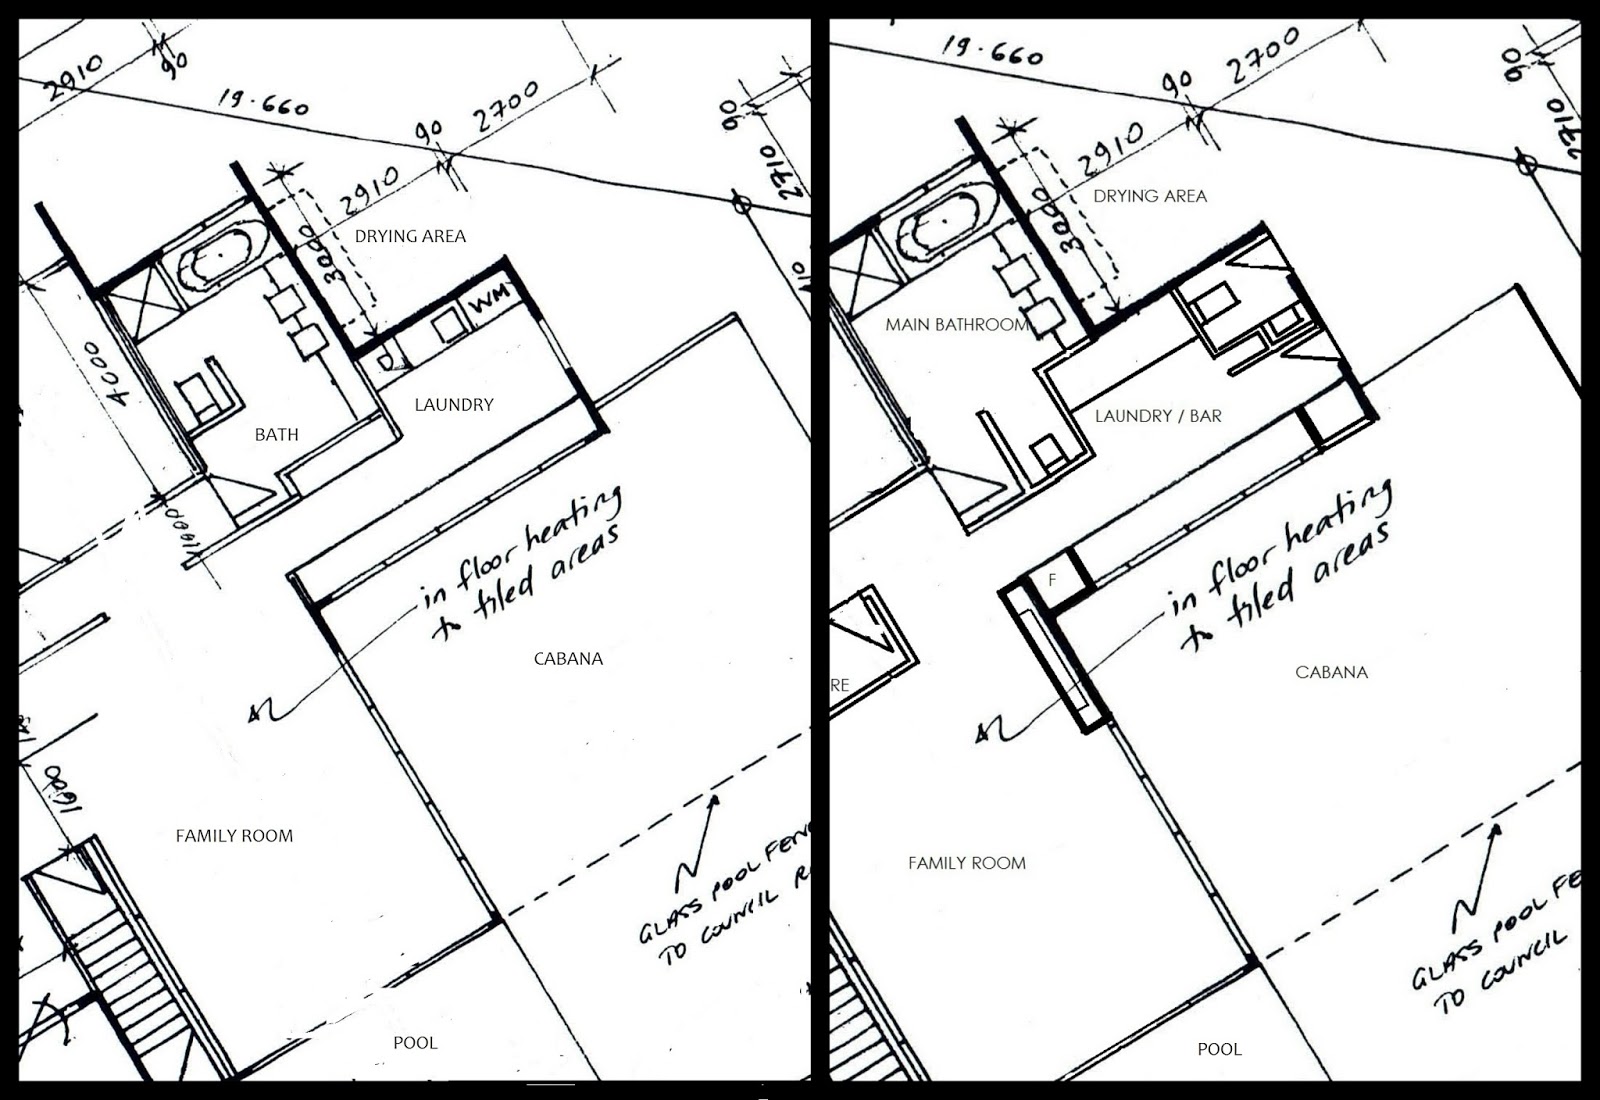
LEFT: Council Plans                                                             RIGHT: Modified design
 When I first designed this area, I deliberately excluded pool toilet facilities. I thought the close proximity of the main bathroom would suffice. When construction started however, I reviewed this idea. Wet feet inside, on slippery polished marble floors, is not a good idea. 
I altered the layout of the  main bathroom and shuffled the space in the proposed laundry to accommodate an externally accessed W.C. This wee little room is complete, as pictured below:


New plan

Another upside of the new layout was that the laundry bench situated opposite the bi-fold windows became centred in relation to it. It now looks balanced when viewed from both inside and out. The linen cupboard was relocated under the stairs (pics HERE) which meant a serendipitous increase in size. Triple win! Yippee!

I asked David to build in alcoves for a fridge (F) and microwave oven (M/W) to allow the laundry to function as a bar / kitchenette when entertaining poolside.
I even managed to accommodate an externally accessed bar fridge for this purpose! The bench top will run through the bi-fold windows to create an external ledge / servery / bar. Mojito anyone?

Timber cladding to bar back was completed in January.
 Council would not allow us to have two kitchens in the house but a second microwave, sink and fridge are permissible. To this end I have purchased a Smeg convection / microwave / grill combi oven. Combined with our BBQ, cooking on this level should be easy and we can avoid traipsing up and down stairs.

Smeg Combi oven: SA45MCX2, Crema Perla Marble flooring and Oak veneer joinery.

The marble previously used in the downstairs bathrooms, (Crema Perla) will also be used on the laundry floor but in a larger 600 x 600 mm format. The floor will be heated for toasty toes in winter too.

There are two 'sides' to the laundry creating a galley effect. The window side will house the sink and dishwasher and I'm planning the joinery to be finished in 2 pac: Dulux Natural White (satin) to tie in with the bathroom joinery already in situ.

That light fitting has got-to-go! What was I thinking!!! ?
Above and below are images of our temporary laundry / cooking set up! Eeeek! 
 (The cabinetry was ripped out of a house David was demolishing). 

I'm contemplating finishing the lower cupboards on the laundry side with an Oak veneer to add some continuity with the oak flooring chosen for upstairs. Inspiration pic below:


There will be doors concealing the washer and dryer so when not in use, the hard working hub of the laundry will be invisible!  Like this but under bench only....


In between the washer and dryer I'm planning for an integrated laundry basket/s like this:

Not sure if I can fit one or two?

The bench tops on both sides are most likely to be made from white ceasarstone.
I've already bought the sink and tap...the sink I boasted about HERE and the tap was also an ex-display bargain!


The one thing I'm still very undecided on, is the wall treatment above the laundry side of the room.
I have entertained all the following ideas at some stage or other...
BAR SHELVING....

BLACKBOARD?

SWISHIER BAR SHELVING. LOL!

MIRROR BACKING

TILE & SIMPLE SHELF?

TRADITIONAL OVERHEADS

ZIP...FOR ART OR FEATURE MIRROR....
 ??????
Another conundrum is this:

In EVERY laundry I've designed for ourselves, I've included a clothes drying rail. I always highly recommend these to clients too. But, the multi task nature of our room is not conductive, aesthetically with this very practical inclusion! Damn!!!
Pinterest to the rescue!!!!


I'm planning a retractable line from inside the broom cupboard to the wall opposite!

Nifty, eh?

One does have to be practical after all!


x KL

Thank you for stopping by my blog. 
You are very welcome and encouraged to comment, I love receiving feedback!

7.2.15

In - console - able

 Well, impatience has got the better of me and I've been shopping for an elusive furniture item for the still not finished house. Again. Ooops!
We have an alcove at the top of the stairs that is pretty vital interiors-wise, as it's the fist thing to be seen after entering the house and arriving, via the stairs, at the upper main living area.

                      LEFT: Council plans                                                                  RIGHT: Modified design with alcove
I've posted about our House Plans before, specifically the changes I made and why we created this alcove HERE. I want the furnished alcove to really have that 'WOW' factor and have had my heart set on a rustic console to contrast with the contemporary architecture and dark wall.

Well, here's my Progress Report:


An existing console, temporarily residing in the entry has turned legs and is way too 'country' for this house and the alcove. It serves a function for now but will be put into storage.


Bought on sale, this Freedom console I bought HERE is just too small for the scale of the room. Luckily, a girlfriend is considering buying it from me.


 This antique console was bought via eBay. It is stunning but, eeek.... too big! Will try to find somewhere else to showcase this beauty.


 So, last weekend I bought this Chinese console off Gumtree and Eureka! Perfect size, style and scale BUT...
Looking up underneath it as you walk up the stairs is less than impressive. Another FAIL!

 Soooo, I'm now back to square one with the alcove. David has suggested a low sideboard with drawers but I think I'll struggle to get something to fit within the shallow depth of 420 mm (the alcove is 2100 mm wide).
 I had a custom designed unit priced and may need to go that route but I really like the look of rustic timber against the dark wall.

Any ideas?


x KL

 Thank you for stopping by my blog. 
 You are very welcome and encouraged to comment, I love receiving feedback!

24.1.15

kitchen thoughts

With the timber floor commitment made HERE, (delivery and installation still to be arranged) my thoughts are onto the next possible project... frustratingly, money for building supplies is not our enemy ATM, but time is. 
Paying someone else to do what David can, when time allows, is money ill spent. So, patience it is.

With this in mind, my thoughts have returned to the kitchen.
I nutted out the plan eons ago and the beautiful B, from B is Building a House, who has sadly evaporated from the blogosphere (please email sweetie if you're still reading!) generously drew some 3D plans to assist in visualisation.
 The design is mostly the same so now I'm on to tweaks and all important details!
These are my current thoughts....


 I am thinking about placing the cook top and sink in-line on the back wall and eliminating the microwave / oven stack. These can be located under counter instead.
I'm currently using an in-line arrangement in our temporary kitchen (the downstairs laundry) and it works well. I'll miss the convenience of a wall mounted oven but this will streamline the back wall. The prominent island will also become devoid of any dish cleaning clutter. The back wall will be topped in stainless steel (LOVED this in our last place) as a heavy duty and practical work surface. I like the idea of a thin edge profile.


I'd like the overhead cupboards to be constructed as long, low units that lift upwards as these images show. I like the horizontal line emphasised, tying into horizontal elements in the house facade.
 I don't want handles.


The Island, being free of the sink, would be a single, large serving area. I'm still holding onto the Cararra or Calacutta dream for this; 20 mm thick and flush with the cabinetry below. (Plain white Ceasarstone is the default option) As it will be 1200 deep, I can have cupboards or drawers on both sides. The outer side, visible from the dining room can be more decorative....maybe something like these:


Again, repeating the horizontal shadow line I 'm fond of.
On the right hand side will be the pantry and home office set up but shallower than originally planned. 450 mm should be adequate.
 I like the concepts in the images below but am not sure how to make the doors work ? Davey will not entertain the use of pocket door either!


Material wise, I would love the rear and right hand side joinery to be constructed with Matt lacquered, quarter sawn, black-stained oak al la my god; Mr Natale but am anticipating this to be out of our budget. Without finding a black-ish textured laminate that's similar, then 5% gloss Dulux Domino 2-pac  polyurethane it will be. The island and fridge joinery will be 5% gloss Dulux Natural White 2-pac too.


Counter tops: Stainless steel rear, Marble Island (fingers crossed)
Floors: Matt Oak.


Appliance wise, I'm in a quandary. I have already bought a sink, Miele dishwasher and oven and integrated Ilve range hood. The oven has been temporarily installed in the laundry but having looked at the price of my preferred cook top, (Barazza Lab, below left) I think I'll leave the oven downstairs and buy a 900 wide Ilve freestanding instead. ? We already have a fridge in situ, so a microwave is the only other appliance needed.


I've posted about the proposed kitchen quite a few times and it has morphed considerably. It can't be installed until the timber floor is laid (which we're waiting to do after the bathrooms and decks are tiled!) so we're still awhile off. I wonder how much of this post will change?
I think I'm starting to lock down all the details though in prep for a green light! Changes are easier done here than regrets when it's built!
 
x KL 

Thank you for stopping by my blog. 
You are very welcome and encouraged to comment, I love receiving feedback!

5.5.14

Choosing the negative...


 If you have been reading this wee blog for awhile, you will know that my current project, our home,  is being decorated in predominantly Black + White. Depending on the percentage of each tone, it could also be described as a White + Black theme. LOL.

 I've previously posted HERE and HERE regarding the two upstairs bathroom plans; the main bedroom en suite and the powder room for J and guests to use.


Yesterday, David and I went serious, intention 'to buy' shopping for our en suite floor tiles and came home empty handed. The Calcutta Marble I liked (deep grey veining on crisp white) was too expensive and the stone that was within our budget was too grey overall and just looked smudgy / dirty. Bugger.

Of course in an ideal world, I would have loved these bathrooms to have the same marble as the downstairs rooms for continuity and flow. When we purchased that lot though, we couldn't stretch the coffers any further and unfortunately, we cannot get a match for it.

Left: Main Bathroom Downstairs                      Right: Guest En suite Downstairs; marble still to be installed under mirror
We have the tiles for the powder room. They are black marble tiles, 600 x 400 mm size, with small amounts of white veining. I had intended on having the floor and the one large wall opposite the door clad in this with the remaining walls white tile. My thought was that our en suite would be a negative of the powder. White with black. Now this is excluded due to budget constraints, my next thought is to tile it to match the powder room. ?

Add caption
This means the opposite of what I've dreamt for our en suite! I had David re-look at our in-stock tile and we have enough to do both floors without any further expenditure but I would have to forgo the black marble clad wall in the powder, again turning my mental images into negatives.

Trying to get my head around this new, cost-effective solution....I'm back to Pinterest and Googling like a mad woman!

x KL

Thank you for stopping by my blog. You are very welcome and encouraged to comment, I love receiving feedback!

11.4.14

Bits & Bobs; random stuff


My girlfriend J phoned a few days ago looking for some bedding advice and after her call I thought I'd do a quick reconnaissance of the latest offerings from around the traps. I stumbled upon this textural delight from Kip & Co; scrumptious dark grey velvet....perfect for winter don't you think? The other colours offered are divine too; burnt orange, teal, cantaloupe and fuchsia. Yum!


David and I celebrated our 13th wedding anniversary on Tuesday. Neither of us felt like going out mid week so I offered to cook a gourmet, candle-lit dinner at home. David's request? Sausages, peas, mash & gravy. W.T.F....


We've had some exciting deliveries here this week. Boring visually, but those metal sheets above will complete the two front veranda roofs and gutters! Hooray!
 And these unbelievably heavy channel thingies below, are for the frame less glass hand rails.


Thought I'd start investigating flooring options for the master en suite. Fell in love with these hexagonal Calcutta marble mosaics which typically require me to sell a child to obtain. Maybe I should stick with the same 400 x 400 mm size tile I've used in the other bathrooms ? ? ?
I could use the hex as a feature under the shaving cabinet and in the bath niche. Thoughts?


 I bought this wire wrapped-glass-based lamp eons ago for the family room. I unpacked it and popped it into position but it just looks wrong. So much for forward planning. Humph.
Might look better in the playroom....

  
School Holidays have begun here today. Yay! And I've got a stash of magazines (print and digital form) to read with lazy cups of tea in bed...he he! For the first time, I've bought H & G in digital format for my iPad. I hate piles of magazines lying around making me feel guilty! Hopefully, when my subscriptions expire, I'll read all my faves this way instead.

Hope your planning a relaxing Easter break...

x KL 

Thank you for stopping by my blog. You are very welcome and encouraged to comment, I love receiving feedback! If you enjoy my ramblings, perhaps consider following by Email, Bloglovin' or Google+. Join this site via Google Friend's Connect so I can follow you too!

3.11.13

Infrared Control (IR)


When I told friends about my entertainment unit design, many queried my specification of solid doors. Doors were chosen over drawers for the storage sections only to save cost. I then went for uniform door material for aesthetics. This raised the question regarding the use of remotes through solid doors and I thought I'd share with you a clever little device called Infrared Control (IR).


David 'discovered' this nifty item to solve the same remote use problem in our last house, pictured above (sorry for the very dark, dodgy picture!). We installed all the T.V.  and stereo equipment behind a section of wall with a 'hidden' door to access it, leaving us with remote operation difficulties.
Enter the IR!


Popping an IR Target discreetly into the wall means you can operate all that hidden equipment without having the doors covering them open. Renting? Hide it in a pot plant!


 I'm no boffin so if you're interested, read this great article HERE which explains all the details and further benefits of the system. (Like operating your gear from another room!)
Problem solved! Yee Ha!

x KL

Thank you for stopping by my blog. You are very welcome and encouraged to comment, I love receiving feedback! If you enjoy my ramblings, perhaps consider following by Email, Bloglovin' or Google+. Join this site via Google Friend's Connect so I can follow you too!