Showing posts with label house progress. Show all posts

5.10.15

Year of The House: September update


  #YOTH15 update for Sea-Spray #2:  
I promised you that September would be a Progress-Packed month and it certainly has been.
David has devoted allot of time working here at home so, there's lots to report! 

  Carpet installed to Playroom, Main, J's and Guest Bedrooms!

Playroom carpeted and lounge in place!
 WE MOVED UPSTAIRS!!!!!! 

Occupying Main Bedroom at last. Art hung. Those lamps are too big! Eeek!
Guest Bedroom ready for visitors!
 
As we have now vacated this room, it's ready for guests! Love my charcoal carpet!
Ordered this bed for one of the downstairs bedrooms as an update. 


Image via Freedom

  Stone top for playroom, Custom entertainment unit delivered and all pieces assembled.

Now to get the telly installed!

  The custom joinery robe for the Guest bedroom has been installed, ready for painting.

TIP: We saved a motsa here by ordering craftwood doors for us to paint in satin enamel, the same as all the other doors in the house. The difference between doing this and ordering two-pac saved thousands!


The fireplace for the main lounge is ready to be collected. Yippee!
David just waiting for some 'muscles' to help collect and unload here. The supplier doesn't deliver. WTF?

  Kitchen and Laundry joinery installed!
Main Kitchen Install: Lots of 'missing' pieces!
 With two big installs at one time, there were bound to be a few hiccups! We are missing drawer and door fronts, trim pieces, an appliance and oven cupboard to name a few. Pretty pics will have to wait! This week I will organise for the stonemasons to come and template the bench tops....
 
Laundry / Kitchenette; Still some parts to come too...
 Stone Walling feature stone delivered 

$500 delivery fee on this lot. The added cost of building in a regional area!

Custom steel handrail for internal stairs installed!
The fixing plates will be hidden in wall & behind a timber riser.
Frameless Glass balustrades for top decks installed.

Support sticks there till grout dried only!
Ordered Faux Grass for Poolside deck area.

Was able to get only one Fencing quote! Accepted this and installation is now complete!

A 5' fence was installed...it's now 6' as ordered. Ooops!
Timber Flooring installed to all areas; upper and lower halls, stairs, study, lounge, dining and kitchen.
 
Study looking a bit Ho-hum.
We decided to wall hang David's desktop. The supports will be painted the wall colour but the whole room looks pretty ordinary. It looks worse now with all the busy paraphernalia a working office contains. Think I'm going to just figuratively and physically, 'shut the door' on this room for awhile!

Lounge room Bookcase shelves installed.

Waiting to be painted now...

I haven't done much blogging as we've been so busy with the house and life in general. 
I'm popping updates on Instagram more frequently if youre interested in the 'gaps'! 

Renovating? Building? Got some House Projects to complete?
Join in! #YOTH15
(also on instagram of course!) 

Missed the progress? Catch up here:
February / March
January / February

x KL

Thank you for stopping by my blog.
You are very welcome and encouraged to comment, I love receiving feedback!

8.9.15

Year of The House: August update


  #YOTH15 update for Sea-Spray #2: 

  AUGUST
Custom entertainment unit joinery for playroom delivered and assembled, steel base ordered and delivered, Stone top ordered.

Identical to the unit in our Family room seen above, but with a freestanding base!

 Still Painting the house.... 

 
Four deck areas tiled and sealed. Only the pool area is now to be completed.

More plumbing and gas-fitting completed.
  The custom joinery robe for the Guest bedroom has been installed ready for painting.


Ordered the fireplace for the main lounge. Yippee!

Sample Image: Ours will have logs / coal and be square set
  Kitchen and Laundry joinery ordered!
 (YUP....We've committed to BLACK!!!!)

Ordered Stone Walling feature stone:

Eco Outdoors Lichen Split Stone Walling

Designed and ordered custom steel handrail for internal stairs. 

Some inspiration pics and fixing ideas....
Frame less Glass balustrades for top decks ordered and delivered.

Booked Carpet installation dates!!!! *Happy Dance!*

Ordered Faux Grass for Poolside deck area.

Trying to get fencing contractor quotes...everyone is so busy after the storm damage earlier in the year!

I just want simple, colorbond fencing....

Next month, we anticipate lots of these orders will  be delivered / installed.
September should be a Progress-Packed month!


Renovating? Building? Got some House Projects to complete?
Join in! #YOTH15
(also on instagram of course!) 

Missed the progress? Catch up here:
February / March
January / February

x KL
Thank you for stopping by my blog. 
You are very welcome and encouraged to comment, I love receiving feedback!

31.8.15

Bubbles...

I am so excited!

Two bedrooms upstairs (our main and J's), the playroom and lower guest bedroom are being carpeted on Wednesday! This had hinged on the timber flooring being laid in the halls adjacent to those rooms, which is what David did today!.


Yesterday we finalised little bits and pieces in the main bedroom en suite in anticipation of the 'big move' upstairs after years of living in only the lower portion of the house.

Heated Towel Rails and shelves for pretty bibs 'n bobs!
Whoop! Whoop!

If you follow me on Instagram, you'll know that I've been unpacking some treasures and purchases from eons ago too. It all feels a bit Christmass-y to be honest! LOL!

The first thing I'd like to do after Wednesday is to have a bubble bath in our freestanding tub...
which made me realise that I have nowhere to rest my celebratory glass of Verve!
Eeeek! How on earth could I have overlooked an item of such importance ? !

Sooo...although it wont materialise before Wednesday, THE bubbly resting spot / table / stool has been on my immediate hit-list!
Here are my (seriously whittled down), main contenders:

L to R: Warren Platner Side Table, Metallic Grande Drum, Mark Tuckey Egg-cup stool, Marcel Wanders Stone Stool, Bamileke stool.
And below are some inspirational images of similar stools / tables like these in situ:


More delicious decisions! (In the interim, a box will suffice!)
But bring on the Bubbles!

x KL

Thank you for stopping by my blog.
You are very welcome and encouraged to comment, I love receiving feedback!

26.8.15

The grass is always greener....

...when it's F A U X !

My last post detailed where I'm planning to place a small area of Artificial lawn.
This product has come a long way since first developed as ChemGrass in 1965 and marketed as Astro Turf a year later!


Although short napped versions are still used, as originally intended, to provide easily maintained indoor sport's fields, today's options include longer lengths which are visually more appealing to the domestic market. They are softer, more natural looking and are a great alternative for areas where natural grass is difficult to either grow or maintain.

 I met with a local Artificial Grass supplier today and chose ours:


It's a longer napped brand and feels very soft and dense.
We chose to go this route for several reasons:
  • It was more cost effective than the travertine tiles thus lowering the overall deck cost outlay
  • Visually broke up and softened this very large expanse of hard flooring;
  • I'll get allot of 'green' without multiple weighty pots
  • No maintenance!
The only negative is the heat. Being 'plastic' it will get hot underfoot. But, no hotter than the travertine tiles. Aesthetically, it will look cooler....

Anywho, with an acceptable quote expected tomorrow and, with some sunshine predicted for next week, this will be another tick we can make, signialling our getting closer to completing SeaSpray #2!

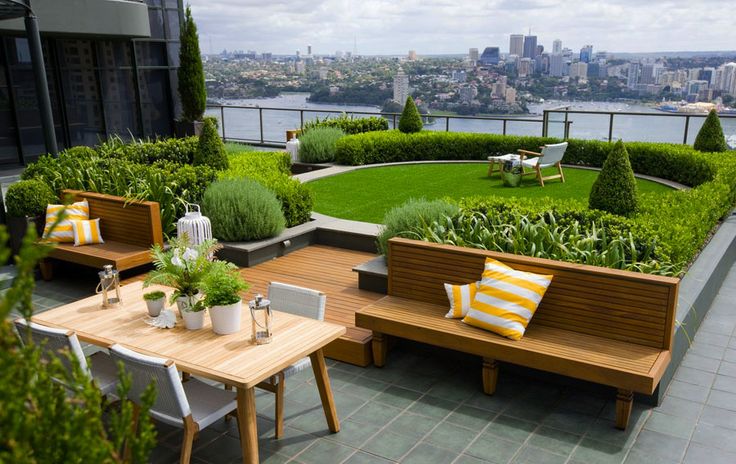
Here are some of my favourite inspiration pics from my Pinterest boards which I've pulled out many, many times in order to finally convince David, that this was a good idea!....


via: The Block


And the image that started the concept for me:

Matt Leacy's Green Rooftop; Landart Landscapes
Looking forward to the 'green' light on this one!
*cough!*


x KL

Thank you for stopping by my blog.
You are very welcome and encouraged to comment, I love receiving feedback!

24.8.15

Detailing: The Cabana

"At the Copa, Copa-cabana!"

It's funny to be detailing The Cabana. At Copacabana...
It is actually a patio / veranda area that is partially covered by the overhanging dining room above.
When we initially applied to council to build, we had some difficulties with our floorspace ratio, until we renamed this deck area a 'cabana'. Problem solved. It's all in a name...


I've mentally divided this area into four zones:
1: The pool. 2: The pool deck. 3: The Cabana and 4: The deck.

The pool zone will have the pool...duh! and a high wall to the left for privacy. I wanted the wall to be dry stacked stone but slate tiles are the fiscal compromise.

I wanted Alpine Dry-stacked stone (above)                                 The budget determined Lichen Split slate tiling...

 I'm planning a bridge / deck area at the end too; something like the Pinterest image below, but simpler...


The pool will have travertine coping which we've already bought and can be seen below:
 

We had the pool form work done a few years ago but illness delayed the concrete pour. Now the steel is too rusted so we need to remove it and start again. Ooops!


An expensive mistake! Hopefully this will happen next month so we'll be swimming by summer! The front wall will be solid masonry with a slither of glass on top so we gain swimming privacy without losing the view when dining. Something like this:


The pool will have a nifty little beach area too, similar to the image below.


We would prefer to tile the pool interior but pebblecrete might be more money wise. That decision is still being debated! If I had no restrictions, I'd tile the pool with slate al-la-bali-style!


The pool deck is to the right of the pool. Both areas are isolated from the cabana and house by a combination of solid walling and frameless glass.

 
 I added the solid walling (shown on the plan in red) to create a niche into which the BBQ can sit.
 I'm planning on inserting a patch of faux grass to soften and break up the large expanses of travertine tiling.

I'm currently 'playing' with cute little faux grass samples
As there are no garden beds on this level (All this area sits on top of the Garage / storerooms) the grass will add some much needed green too!


Above is my all time favourite example of how beautiful faux lawn can look!

I have purchased a lounge for this area too.

My bargain Myer Vue Sunlounge!
The Cabana itself is covered by the top storey of the house. The three big stacking doors between it and the family room retract completely into a wall allowing unfettered access between areas. The television is easily viewed from outside if required. The laundry / kitchenette / bar room opens onto the cabana, via bi fold windows. and the bench top will run through to outside creating the 'bar'.

via Pinterest
 I've just ordered the joinery (Whoop whoop!) and these stools for this area:

There is also a mini bar fridge, accessible cabana side, for refreshments when the bartender is having a dip! LOL! The area will be furnished with one of our existing day beds, a dining table and chairs. (I'm thinking the chairs will need to be replaced...)

We have two day beds to choose from. Images above are of our last home.
The flooring in this area, as elsewhere, is French pattern Travertine which has just been completed.

Half way and ungrouted. All the Cabana floor is finished now!
 I'd like to add just one or two big pots with statement plants. Simple and contemporary. So far, the only really BIG planters I've found are  w a y  out of my budget (try $4K!) so not sure if I'll achieve this!


The deck is a small area providing the laundry with access to the rear clothes drying area and guests access to an externally located bathroom when wet from the pool. 

The deck off the Laundry / Pool W.C.
Finished Pool W.C.
We have decided to screen this area from the Cabana to create a windbreak from the South. (Shown in red on plan above) Copacabana is notoriously windy with most of the gusts coming from the South. As we face North, we are well protected by the house's bulk but this opening was creating a wind-tunnel that needed to be addressed. We'll use timber to match the lower bar area.

the completed bar front
Well, that's this area detailed. There was a myriad of decisions in this zone alone and I'm really looking forward to seeing it all come together. Rain is forecast for this week so that will slow us down but then we'll be full steam ahead again!

x KL

Thank you for stopping by my blog.
You are very welcome and encouraged to comment, I love receiving feedback!